Интерьеные игрушки, мишки Тедди, косметички, блокноты и украшения

Интерьеные игрушки, мишки Тедди, косметички, блокноты и украшения
Показаны сообщения с ярлыком МК. Показать все сообщения

вторник, 5 апреля 2016 г.

Лоскутная сумка для покупок с апликацией МК на английском

Guest Project — Applique Tote Bag!

Hi! I am Missy from The little Green Bean. Jennifer from Tatertots and Jello has allowed me to do a guest post today and I am so excited! Thank you Jennifer!
 
I like to do about any type of craft. I scrapbook, sew, paper craft, and I also have a small photography business. I love to re-decorate my home using things someone else might just throw away. I am very happily married to a man who supports all of my hobbies, he even helps me out when I need, from anything to modeling aprons, to helping me re-paint the kitchen. We also have 3 boys who are our pride and joy!
Today I am going to share a tutorial with you on making an appliques tote bag.
I like to make things that are unique and I use all my own patterns. So here goes!

Step one is to gather your fabric choices, I love to use scraps for this project.
Once you have your fabric for the applique design, iron each piece onto heat and bond, let cool.
Now, you can either create your own design, or use something like a cricut to help you out. I used the cartridge walk in my garden, and selected the leaf design for this project. You will want a fresh cutting mat and a new blade for cutting fabric for the best results.
I cut 2 leaves of each fabric, 1 1/4, and 2 inch leaves. I used 6 different pieces of fabric.
Once you have all your pieces cut, peel the paper backing off of them and place on your front tote piece.
My tote is made from a sold medium weight fabric. I cut the pieces 12 x 13. 2 for the outside and 2 for the inside. Iron applique pieces in place.
Once Ironed on, you are ready to sew them in place. I use the embroidery stitch on my machine, but any stitch will work for this.
Once all the petals are in place, you can sew the stems. I free hand this, but you could lightly draw your line with a pencil. I also like to make random line stitches all over the front of the bag.
I then apply fabric circle to the ends of all the other stems, and sew a button in the center.
The applique part is done, you can do as much or as little as you would like.
Now I assemble the tote, again, this is all up to you. I like pockets, so I add a back pocket, an inside zipper pocket and extra inside pockets for phones, lipstick, etc. This is all up to you.
I cut an apply more of my coordinating fabric to the top edges of all 4 pieces. Make sure to line with a heavy weight interfacing, and sew the front and back of the outside together. For the lining, apply all your pockets, top edge, and again sew the front and back together, wrong sides facing each other. You will want to leave a 6 inch opening at the bottom of the lining to turn when finished.
This is also where you add your straps. Pin them into place on the outside front of bag. With wrong sides together, sew the inside to the outside at the top edge. Turn right side out, then sew opening shut.
Add a top stitch to the outside edge if desired. And you are done!
You now have a fun new tote bag all your own design! 
Thanks for checking this out, now be sure to stop by my blog and see some of the other fun things that I like to do!
That bag is adorable Missy! Thank you so much for sharing it with us :) I discovered Missy’s blog a few months ago and was hooked. She can decoratie, she can cook, and boy can she sew!!! You will be amazed at her talent!
  источинк http://tatertotsandjello.com/2010/07/guest-project-applique-tote-bag.html

понедельник, 29 февраля 2016 г.

Мастеркласс на английском по закладкам и открыткам с гербарием

Sunday, August 15, 2010

Pressed Wildflower Bookmark Tutorial


I have had lot's of questions about this technique I use for my bookmarks, and also asked if I have a tutorial, well now I do.
I decided to put it all in one post for you and keep a link under "tutorials" on my side bar.

First let me say, this is a tutorial on " how I make my bookmarks", I do not claim in any way at all the wax paper and tissue technique as my own. As I have said in a previous post I found this technique in an article by Susan Hannen in the Spring 2008 issue of Somerset Life magazine. It really is a beautiful issue, I look at it over and over and never get tired of it.

Susan had found this technique in a 1950's Boy Scout handbook and then went on to fiddle with the recipe until she got it right. I have done the same thing, you may need to fiddle, or experiment with amounts of glue and water used to achieve the look you prefer.

Here are the products I use, 3 ply tissue, Aleene's tacky glue, and Reynolds wax paper which I purchase at the $1 , I hope you can find it at your dollar store too, I use wax paper all the time for working on when I am making a mess, and as a paint pallet, it's great stuff :)

The glue I have used just happened to be the brand I had at home when I first tried this, I am sure you can use any regular glue, but you will have to play with it and see how your brand works for you.

In the second stage of the bookmark I use these products, or gloss gel medium, depends what I feel like. Bits of fiber, and the ink for edging.

So let's get started. Combine a mixture of approx' 60% glue to 40% water. To be honest I just guess. You don't want it too watery and you don't want it too gluey either.
Mix it really well with an old brush. This is the one I use below just some old thing but the bristles are still soft.

For my bookmarks I use a piece of wax paper from the roll wide enough to make several at a time. Then position my pressed/dried flowers the way I want them.
You can add some fiber at this point too so it is under the glue mixture, or add it later with gel medium. I do it both ways.
I use the shinier or top side of the wax paper to lay my arrangement.
(Val has asked if freezer paper would work, but to be honest I have no idea. I have a feeling there would not be the waxiness in it, but let me know if you try it please :)

Grab a tissue from the box and separate it into 3 ply's, you are only going to use 1 ply. This part I find important because I tried using a 2 ply and I really didn't like the look, it wasn't as transparent.

Make sure you are not in a breezy room to do this, or have a fan blowing :)

Take your tissue and gently place over your arrangement. I hold a section of it lightly with a finger tip as I apply the solution to the tissue.
Dab it gently and not too much, don't over do it or the tissue with split open on you. I first do the section where the flowers are and they don't seem to move once that is done.
Then I work around the arrangement as shown below. I need enough to use as a bookmark so I cover a good area and then I will trim it later. I usually do a row of these so I can use up all the glue/water mixture.

Now you have to be patient and let it dry all day or overnight. Then it will look like this ....

Next step: If you are making a bookmark, cut out two pieces of white "watercolor paper" in the size you would like your bookmark. I am using 140lb cold press which is a heavy weight paper, and sturdy enough for bookmarks.

Using a metallic gold thread I now take it to the sewing machine and with one piece of the white watercolor paper I stitch the wax flower paper to it, around the edges.

Tidy up your threads and bring it back to your glue table :)

Turn over the piece you have stitched on and place some ribbon as shown below. Glue this to the paper and then glue your second piece of watercolor paper over top of this.

(Another option is to punch a hole in the bookmark when it is finished, then add ribbon. I do it both ways.)

Now I edge the back with the green ink and sign it if I remember. When that has dried which isn't long, turn it over the front again.

Now you can edge the front with the green ink too.
Don't forget these are just my steps, you can do whatever your little heart desires, use any ink, any thread etc etc, just do your thing :)

If you didn't add any fibers under the tissue, you can still do it now. Take a very teeny tiny amount and lay it where you like the look of it. I stick my little finger in the gel medium and rub it right on top of the bookmark. Make sure to let it dry well.
This is usually when I add "words" if I am going to, do it at the same time.


Now you have a pretty bookmark, which would make a lovely gift with a book or for a garden/nature lover, for anyone really, wouldn't you love one?

Here are two that I finished and put in plastic sleeves. I try to make them skinny enough to do this so it protects the bookmark, that way you can actually use it and not worry about it getting dirty, but sometimes the flowers I use are too wide for these plastic sleeves :)

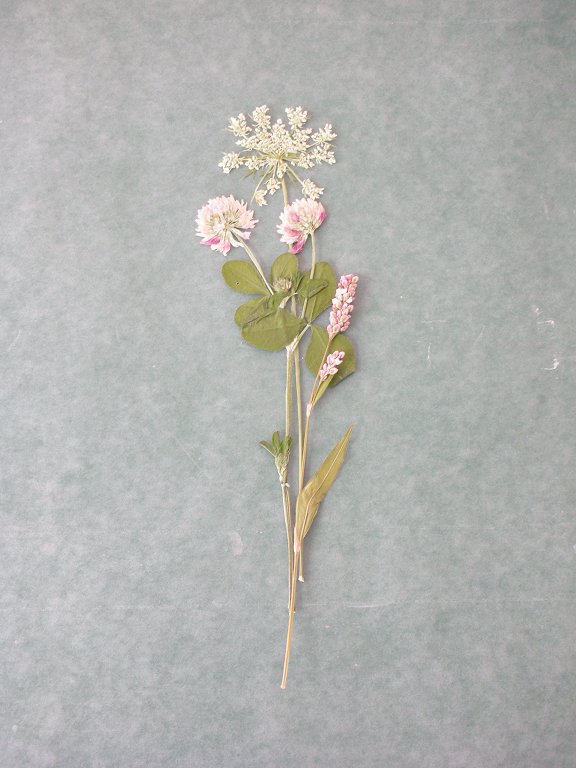
I use a microwave flower press to dry my flowers and this is my wildflower series, but you can use whatever dries nicely for you, or has been in a flower press long enough to be dry.

Here are the links to my other posts featuring dried flower art....

ссылка на источник http://hercreativespirit.blogspot.ru/2010/07/flower-art-and-gifts-from-friends.html


Cut, Dried, Pressed and Preserved

I was just heading upstairs to start packing up my studio, and remembered I had not posted this. I recently discovered a beautiful way to use my dried, pressed flowers. Take a lookie...
This is an altered mini notebook.

And this is a gift tag I created over some dictionary paper and card.
To see the details you really must click on the photos and view the close ups, they look so much better.

I was flipping through some older Somerset magazines and came across this method of preserving dried flowers. The lady in the article had found the instructions in an old boy scout book. Darned if I can find this magazine, maybe I packed it up already, but I am so excited to share with you the process. It sounded so easy, so I thought ok....... try it, if you ruin a few flowers you can dry more this year.

Look at this pretty close up. It is almost transparent so they look so different depending on the background you place them on, this was taken on my patio table which is a dark brownish color.

If you want to give it a try, this is what you will need:
Wax paper, tissues (kleenex), and a mixture of glue and water.
The article said 60% glue to 40% water.

Lay out your waxed paper and make a design or collage with your flowers. Take a tissue and use only one ply , then lay gently on top of your design. Very carefully apply the glue and water over the tissue.
Now you have to leave it for about 12 hours or overnight, then using a cloth over it, take your iron and press firmly.
Ta da... now you can use this to create something beautiful :)

I want to try sewing over the tag using fabric behind it, but my sewing machine is broken. I think it would make a really nice effect.

I used a microwave flower press which I found last year to dry these flowers and they have been squished up in my dry flower press all winter. If you would like to dry flowers quickly check out my post on the Flower Press here.
I have found that the mum's I dried turned out really well, and the leaves above are from my Virginia Creeper last fall. I know when I get moved I will be doing more of this :)


http://hercreativespirit.blogspot.ru/2010/05/cut-dried-pressed-and-preserved.html

четверг, 5 марта 2015 г.

Косметичка-клатч мастеркласс

Если сделать побольше то будет клатч, а если поменьше то кошелечек! В общем можно варьировать размерами как хочется.

Нам нужно – ткань для верха, подкладка, застежка-магнит, флизилин, ткань для уплотнения, вшивной кант.
IMG_3069ю
Выкройка, без учета  припусков на швы. Выкройка для переда и спинки косметички, только перед сверху в процессе надо подрезать, на выройке это обозначено дугой. По центру наечено место для застежки-магнита.
IMG_3077ю Клапан в длину меньше на 0,5см( на выкройке сверху отмечено).По центру намечено место для застежки-магнита.
IMG_3080ю


Кроим все детали косметички из основной ткани, прокладки и подкладки. Если на ткани узор, то обратите внимание, чтоб он совпал! Не забываем про припуски на швы!
IMG_2914ю
Проклеиваем флизилином ткань верха и подкладку. ( у меня подкладка из полиэстра, если ваша подкладка из шелка, ее нельзя проклеивать!)
IMG_2915ю
Теперь намечаем вытачки на подкладке, зашиваем их и заутюживаем.
Коллаж Picnik
Затем  детали основной ткани складываем с прокладкой - тканью для уплотнения(у меня это жесткий тонкий лен), на детали переда подрезаем верх(скругляем его, как показано на выкройке), верх деталей спинки остается ровный. Соеденяем основную ткань с прокладкой(подкладку пока не трогаем!) строчкой, можно дать строчку только сверху, а по остальным сторонам сколоть.
Коллаж Picnik1
Теперь намечаем вытачки на лице основной ткани. Из уголка вытачки даем строчку , закрепку не делаем,  ниточки не обрезаем!Делаем надсечки, как показано на фото. – Так  делаем, потому что у нас под основной тканью есть  прокдака для уплотнения, и  вытачки зашить обычным способом сложновато!Коллаж Picnik2 С изнанки теперь зашиваем вытачки начиная от надсечек и до конца нашей вспомагательной строчки, там где торчит ниточка!
Коллаж Picnik3 Вспомагательную ниточку вытягиваем или просто обрезаем. Саму вытачку до половины  разрезаем и заутюживаем!
Коллаж Picnik4 Теперь намечаем на одной детали клапана и на передней детали косметички место для застежки магнита. (Отмечено на выкройке)
Коллаж Picnik5 Ставим магнит.
Коллаж Picnik6 Коллаж Picnik7 Коллаж Picnik8 Теперь берем вторую деталь клапана(та что без магнита)подкладываем ткань для уплотнения и пришиваем кант.
Коллаж Picnik9


Затем сшиваем весь клапан, по строчке, которой мы пришивали кант.
IMG_2995ю
По всему припуску делаем надсечки, на ткани я вырезала треугольнички для хорошего скругления, а кант просто разрезала, так как он атласный может сильно посыпаться.IMG_2996ю  Клапан выворачиваем, даем отделочную строчку и проутюживаем.
Коллаж Picnik10 Пришиваем клапан к спинке косметички.
IMG_3012ю Сшиваем спинку с передом.
IMG_3015ю Также сшиваем детали подкладки.
Припуски на швы  подрезаем до 0,5см( плотность вытачек я на припусках тоже срезаю).
Коллаж Picnik11 Выворачиваем заготовку из основной ткани и вставляем ее в подкладку.
IMG_3023ю

Пришиваем их друг к другу, оставляя небольшое отверстие для выворачивания.
IMG_3024ю
IMG_3026ю
Выворачиваем.
IMG_3028ю
Перед тем как давать отделочную строчку можно подутюжить шов или приметать.
Отделочную строчку легче давать когда косметичка вывернута подкладкой вверх.
IMG_3030ю
IMG_3031ю
IMG_3034ю
Коллаж Picnik12
Хорошенько проутюживаем  швы и выворачиваем.
IMG_3038ю

IMG_3039ю
IMG_3040ю
Чтоб клапан лучше лег в закрытом виде, на сгибе его тоже можно приутюжить немного.
IMG_3064ю
IMG_3046ю
Вот и все, косметичка готова!
Коллаж Picnik13 Надеюсь МК вам пригодится, если что то непонятно, спрашивайте.
Приятного вам процесса!:)

IMG_3053ю

цитата http://lusivsevozmojno.blogspot.ru/2011/02/blog-post_18.html


еще один Мастеркласс
Само слово клатч – английское, означает – хватать (цепкой женской хваткой :) А посему обходится клатч и без ручек и без ремешка.
Свою первую популярность сумочки клатч приобрели в 20-30-е годы прошлого века. Клатч был не последним элементом выходного вечернего гардероба аристократии. Поэтому шили клатчи из соответствующих материалов – крокодиловой и, даже змеиной кожи, и богато отделывали. Второй подъем популярность клатч пережил в послевоенные годы, когда к его популяризации приложил руку сам Кристиан Диор!
Очередная волна повышения интереса к клатчу наблюдается и в наши дни.
Правда, похоже, клатчи крепко усвоили заветы дедушки Ленина и сейчас стараются быть ближе к народу, а значит и шьются нынешние клатчи из простых, доступных материалов и являются дополнением уже к деловой и повседневной одежде.
Ниже, я предлагаю вашему вниманию выкройку клатча с описанием, как его сшить. Выкройка примерная, посмотрите методику пошива клатча, и уже на основе ее приступайте к пошиву клатча своими руками!
Выкройка клатча. Как сшить клатч?
Выкройка клатча: передняя и задняя часть.
Итак, как же сшить модную сумочку клатч?
- Распечатайте выкройку в нужном масштабе;
- вырежьте детали выкройки;
- приложите выкройки на ткань и обведите их с учетом припусков на швы;
- вырежьте детали клатча из ткани;
- сшейте их вместе;
- используйте полученные выкройки для шитья следующего клатча ;)
Выкройка клатча. Как сшить клатч?
Схема пошива сумки клатч.
Ткани на пошив клатча требуется весьма немного, что позволяет сшить эту модную сумочку на все случаи жизни!  Вот, кстати, еще одна бесплатная выкройка клатча. Так, на всякий случай :)
А если пошива клатча, вам захочется чего-то побольше, то попробуйте что-нибудь сшить по этим выкройкам женских сумочек!


цитата http://odensa-sama.ru/zhenskie-sumki-modnyj-klatch-svoimi-rukami/